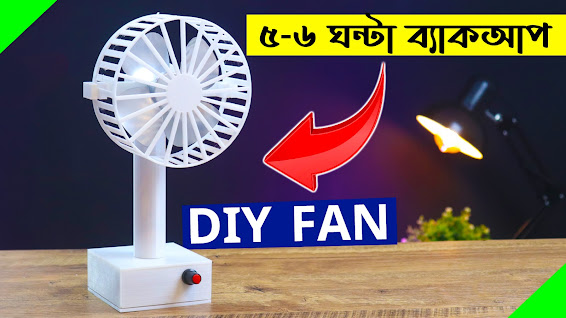
DIY Rechargeable Fan Making At Home || 5-6Hours Backup System
DIY Rechargeable Fan Making At Home || (5-6)Hours Backup System
Every electronic device needs PCBs. Are you looking for the Best PCB order? PCBWay is one the best PCB manufacturing companies. Order 10 pcs PCB for only $5. Visit now https://www.pcbway.com/?from=technology4power
In a world where ingenuity meets practicality, DIY projects stand as a testament to human creativity. Among these, building your own DC fan from scratch offers a blend of satisfaction and utility. In this comprehensive guide, we'll embark on a journey together, exploring the intricacies of crafting a DC fan using a 180 DC motor, 3D enclosure, DC motor speed controller, 18650 battery, and TP4056 charging circuit. Let's dive into the realm of DIY innovation and unleash the maker within!
First, we need a 3D Enclouser which is very important for making this type of fan. I start designing on Fusion 360 3D design software. Part I separately designed and then combined all parts in this fan.
DIY Universal DC Motor Speed Controller with MOSFET
If you've ever wanted precise control over the speed of your DC motor projects, this is the guide for you. With the power of MOSFET technology, you'll be able to adjust the speed of virtually any DC motor with ease. Here's what you'll need and how to do it:
Fig (01): Circuit Diagram
I will show Fig(01) on the DC Motor Speed Controller Circuit. I converted the circuit into PCB which made my project easy & professional looking. If you want to convert your circuit into a professional PCB, You will visit the PCBway Official website. PCBway Provides you with professional-grade PCBs.
Fig (02): Circuit Diagram
Every electronic device needs PCBs. Are you looking for the Best PCB order? PCBWay is one the best PCB manufacturing companies. Order 10 pcs PCB for only $5. Visit now https://www.pcbway.com/?from=technology4power
Materials Needed:
- 1. IRF540N MOSFET
- 2. Potentiometer (variable resistor)- 100KR
- 3. Capacitor (1000uF, 16V)
- 4. Resistor 1K
- 5. Heat sink for MOSFET
- 6. Power Socket
- 7. Switch 6 Pin
- 8. AC 2 Pin Terminal Block
- 9. LED 5mm
Charging Unit:
I need an 18650 battery charge controller. for this purpose, I select the TP4056 charging module.
The Module uses a linear charging method that ensures optimal battery health By delivering a constant 1A charge current until the battery reaches a cut-off voltage of 4.2V. LED indicators provide a quick overview of the charging status: red for charging and blue when charging is complete.
Specifications:
- 1. Despite its compact size, this charging module offers robust short-circuit protection, ensuring safe use even in complex electronics projects. With a weight of only ~1.7 g and dimensions of 29 x 17.3 x 4.3 mm, it can be easily integrated into your projects without taking up unnecessary space.
- 2. Input voltage: 4.5 V-5V
- 3. Maximum charging current: 1000mA/li>
- 4. End of charge voltage: 4.2V +-1%
Features:
- Led indicator: red is charging Green is fully charged.
- Current Protection: Yes
- Inversed polarity: NO.
- Use mature charging chip TP4056 for simple peripheral circuits, good protection performance, and high charging accuracy.
- Fully machinery automated processing, all patch parts manufacturing.
Using the Module:
- Connect TYPE-C cable for power, or 5V DC to pads marked IN+ and IN- on the left-hand side of the module
- Connect the cell to charge to B+/B- pads on the right-hand side of the module.
- A load (something for the battery to power) can be connected to the OUT+/OUT- pads on the right-hand side
- Important! Disconnect load when charging
- The red LED indicates charging in progress, green LED indicates charging has finished.
- Never charge your battery at a rate greater than 1C.
Note:
- The Amp Meter can only be connected to the 5v input end of the module.
- It is better that the charging current is 37% of the battery capacity. If you charge the 1000mAH battery, the current of 400 is enough.
- The connecting cable should not be too thick.
- Make sure the connection point is good.
- If the input voltage is too high, such as 5.2v, the current will be less than 1000Ma, it is normal. It is the protection
- function automatically abstracts the charging current to prevent chip burn damage.
- There is NO reversible polarity.
Assembling the ingredients:
Combine the heart of our creations, with precision and care. From mounting the motor to connecting the speed controller, each step brings us closer to the realization of the DIY masterpiece. Take your time to ensure that each component is securely fastened and properly aligned within the enclosure, minimizing the risk of damage or error.
Wiring and Connections:
Navigate the intricate pathways of wires and connections, wielding your soldering iron with finesse. Fuse metal with purpose, ensuring each connection is a testament to craftsmanship and reliability. Refer to wiring diagrams and datasheets to ensure proper polarity and connection points, and use heat shrink tubing to insulate and protect soldered joints from damage.
Video Reference:
Every electronic device needs PCBs. Are you looking for the Best PCB order? PCBWay is one the best PCB manufacturing companies. Order 10 pcs PCB for only $5. Visit now https://www.pcbway.com/?from=technology4power
As we conclude our journey of DIY exploration, take a moment to admire the fruits of your labor. With determination and creativity, you've crafted a DC fan that not only cools the air but also warms the soul. Embrace the spirit of innovation, and let your imagination soar as you continue to explore the endless possibilities of DIY craftsmanship. Whether you're a seasoned maker or a novice enthusiast, remember that the journey is just as rewarding as the destination, and each project brings us one step closer to realizing our full creative potential.


.jpg)


No comments