Best DIY SPOT WELDER MACHINE for Batteries 🔥How to Use? How to Work? PCBWay
Best DIY SPOT WELDER MACHINE for Batteries 🔥How to Use? How to Work? PCBWay
If you’re working on battery pack projects using 18650 lithium-ion cells, then you know how important a spot welder is.
Buying a professional spot welding machine can be expensive, but today, I’ll show you how to make a simple DIY spot welder at home — using easily available components.
This project uses a 555 timer circuit to control MOSFETs that deliver short, high-current pulses for welding nickel strips onto 18650 battery terminals.
Let’s go step by step!
🧠 What is a Spot Welding Machine?
A spot welder is a device that joins two metal pieces (in this case, nickel strips to battery terminals) by passing a high current for a very short time.
In battery pack assembly (especially 18650 Li-ion packs), spot welding is preferred over soldering because:
🔋 It prevents battery overheating.
⚡ Ensures strong electrical contact.
🔧 Is faster and more professional for battery pack building.
🧩 Working Principle of DIY Spot Welder
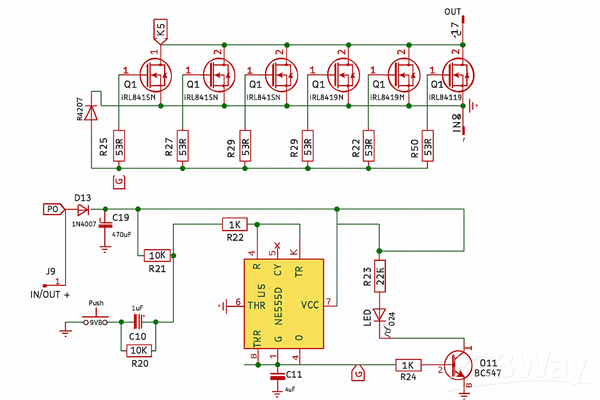
Our DIY spot welder circuit uses a 555 timer IC configured in monostable mode.
When the push button is pressed, the timer triggers the MOSFET bank (IRLB4132), which allows a short pulse of current to flow from the input (power supply) to the welding electrodes.
This short pulse generates enough heat to weld the nickel strip to the 18650 cell without damaging it.
⚙️ Components Required
Here’s the complete components list you’ll need to build your own spot welder:
1 × NE555 Timer IC (U6)
1 × NPN Transistor BC547 (Q11)
6 × N-Channel MOSFET IRLB4132 (Q12–Q17)
1 × Diode 1N4007 (D13)
1 × Fast Recovery Diode FR207 (D15)
1 × LED Indicator (D14)
1 × Push Button Switch (SW3)
1 × Capacitor 470µF (C18)
2 × Capacitors 1µF (C10, C11)
1 × Resistor 1KΩ (R22)
1 × Resistor 10KΩ (R20)
1 × Resistor 10KΩ (R21)
1 × Resistor 2.2KΩ (R23)
6 × Gate Resistors 33Ω (R25–R30)
1 × Resistor 1KΩ (R24)
1 × Input/Output Connector (J9, J8)
Power Supply (12V–24V, High Current)
Thick Copper Wires or Welding Electrodes
🧰 Circuit Diagram Explanation

Let’s understand how this circuit works:
- 555 Timer Section (U6):
- Configured in monostable mode, it produces a single pulse each time the push button is pressed.
- The pulse width is determined by R21 and C11 — typically giving a 10–100 ms pulse.
- Transistor Stage (Q11 – BC547):
- Acts as a signal amplifier for the 555 timer output.
- Controls the gate voltage of the MOSFET array.
- MOSFET Array (Q12–Q17 – IRLB4132):
- These MOSFETs handle the high welding current.
- They switch ON simultaneously to pass a large pulse from the power input to the welding output.
- Power Section:
- The diodes (FR207 and 1N4007) protect the circuit from reverse polarity.
- The 470µF capacitor (C18) helps smooth out input voltage fluctuations.
🧪 How the Spot Welding Works
Power ON the circuit (using a 12V–24V DC high-current supply).
Press the push button (SW3) — this triggers the 555 timer.
The timer output activates the MOSFETs for a short time.
High current flows through the welding electrodes.
The nickel strip gets welded to the battery terminal within milliseconds.
🧾 Output Testing
Connect the power supply (12V–24V DC, high current).
Attach the welding electrodes to the OUT+ and OUT– terminals.
Check the output LED (D14) — it should blink briefly when the button is pressed.
Measure output voltage across electrodes — it should pulse momentarily (not constant).
Test pulse duration — you can adjust R21 or C11 to change pulse width.
Use a dummy metal strip before welding real batteries.
Once tested, connect nickel strip and 18650 cell in place and press the button.
The weld spot should be strong, shiny, and firm — not overheated.
Check MOSFET temperature after multiple welds.
Ensure proper wire thickness to avoid voltage drops.
⚡ Important Notes
Always use thick wires (at least 8–10 AWG) for the welding current path.
Use a high current DC source like a car battery, Li-ion pack, or 12V 100A SMPS.
Ensure MOSFETs are mounted on heatsinks to prevent overheating.
Adjust pulse timing carefully — too long can damage the battery, too short may result in weak welds.
Keep electrodes clean and pointed for precise welds.
💡 Advantages of This DIY Spot Welder
🔋 Perfect for 18650 battery pack building.
⚙️ Simple, low-cost circuit.
🔌 Adjustable pulse duration using 555 timer.
🧠 Easy to build — suitable for beginners.
🔥 Delivers strong and clean welds.
🧩 Applications
18650 Battery Pack Welding
Nickel Strip Welding
Li-ion Battery Management Projects
Power Bank or E-bike Battery Assembly
DIY Electronics and Robotics Projects
🧠 Pro Tips
Use IRLB4132 or IRF3205 MOSFETs for better current handling.
You can upgrade to a digital timer for more precise pulse control.
Always test on scrap metal before welding live batteries.
Ensure proper ventilation and safety gear while welding.
🎥 Video Reference:
$5 10pcs 1-2 layer PCB Order from PCBWay: https://www.pcbway.com/?from=technology4power
🧰 Conclusion
With this simple DIY Spot Welding Machine, you can easily weld 18650 battery cells and build your own battery packs at home.
It’s an affordable and powerful solution for hobbyists, makers, and electronics enthusiasts.
By using a 555 timer, MOSFET bank, and high-current power source, you can achieve professional-quality welds safely and reliably.


No comments